4. Keyboarding your draft
Introduction This module explains how to keyboard your draft translations into a project in Paratext 9.
Before you start We are about to keyboard text into an existing project. Before you can do that, someone must have already installed the program and created a project for your data.
Why this is important This is the first stage of entering your translation into the computer. Once the text has been typed, you can run various checks on the content and format of the text.
4.1 Go to a Biblical verse
Before you can start typing your text, you need to move your cursor to the correct book, chapter and verse. You use the toolbar to do this.
Using the icons on the toolbar, change the project, book, chapter and verse as needed.

In Paratext 9.3 you can copy and paste a scripture reference into the book name on the navigation bar. For example, in English: MAT 12.3, Mrk 5:4, Galatians 1:12.
If you don't know the verse reference, you could use the Find feature to look for a word that occurs in the verse you are looking for. Ctrl+F.
4.2 Check that the project is editable
Look at the titlebar of your project.
The titlebar should have the word (Editable).

- If it is not editable, try changing the view (see below).
- If the book is still not editable, and you need to edit it, you should talk with your project administrator.
4.3 Changing the view
Paratext 9 has five views. You can edit all views except the Preview view.
- Ctrl + E -or-
- ≡ Tab under View menu, choose the view (usually Standard).
4.4 Typing special characters
Some orthographic characters are not found on the keyboard. To type these characters, you may need to press more than one key.
- Change your keyboard system as needed on your computer.
- If you are using Keyman then choose your keyboard (e.g. Tchad Unicode) (or for MS-Keyboards choose AF or TR/SQ/TZ/AF…)
- Type the keys for the special character (see the chart provided with your Keyman file).
You can use ≡ Tab under View > Highlight Invalid Characters to quickly see if you have typed any invalid characters. If you see lots of punctuation, then ask your instructor or administrator to configure your character inventory.
4.4.1 Whitespaces and invisible characters
Paratext 9.5 introduces better support for displaying and entering whitespace and invisible characters. However, to use this, all members of a team must upgrade to 9.5, as the project will no longer be back-compatible
Any project can turn the display of these characters on and off. Projects that use a variety of whitespace and invisible characters will benefit from opting into or “enabling” the feature.
This feature allows teams to view and edit whitespace and invisible characters in these areas:
- Text editor, Wordlist, Spell checking dialogs, Results list,
- Scripture Reference Settings, Numbers Settings, Character inventory, Quotation Rules.
The Administrator enables it by clicking the dropdown on the paragraph icon on the toolbar

4.5 Adding text in another marker – title or introduction
Each piece of text needs to have a marker. The markers for the chapters and verses are already in your project. When you want to add text such as headings or introductions, etc., you need to also add the appropriate marker as follows:
- Move your cursor to the end of the previous paragraph:
- Type Enter
- Type the marker (e.g. s1 or ip) press Enter (or select it from the list).
- Type the text
- Add a paragraph marker after the text (for example: \p)
You must always have a USFM marker after a title and before the verse. This is usually \p (normal paragraph), but it can be different (for example \q1).
Character markers
Paratext has both paragraph and character markers. As the name suggests, paragraph markers format the whole paragraph. Character markers let you format part of the paragraph and so need a beginning and ending marker.
- Select the text you want to apply the character style
- Type ****
- Select the marker from the list (e.g. nd)
- Press Enter
- Paratext adds the two markers (before and after the text)
(for example: \nd LORD\nd*)
It is important to note that pressing Enter displays paragraph markers and typing \ displays character markers.
4.6 Add paragraph breaks
Dividing the text into paragraphs:
- Move the cursor to where you want to break the paragraph.
- Press Enter
- Type p, then Enter.
4.7 Saving your work
It is important to save your work regularly.
- ≡ Paratext under Paratext > Save All
- OR Ctrl + S
4.8 Insert Footnotes
You can add footnotes in the text at the place where you want the reference to appear.
- Move the cursor to where you want to insert the footnote.
≡ Tab, under Insert > Footnote
- A set of footnote markers is added in the box below the text
Type the text after the \ft
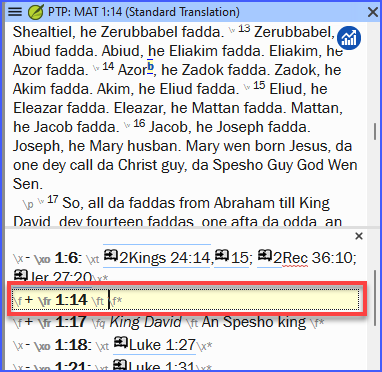
If you hover your mouse over the superscript letter, the text of the footnote will be displayed in a tip box.
- To change the footnote, click the superscript letter in the text.
- To delete the footnote, you can delete the superscript letter.
- or right-click the footnote text and choose delete.
4.9 Send/receive
It is essential to have a second copy of your translation and to share your work with others in your team. This is done by doing a send/receive as follows:
Send/receive this project to the Internet
- Make sure your computer is connected to the Internet.
- ≡ Tab under Project,> Send/Receive this project
- Paratext will immediately Send/Receive i.e. without offering the different options.
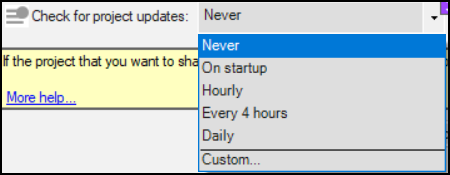
In 9.4, Paratext can notify you when there are updates to any of your projects.
On the Send/Receive dialog, below the list of projects
Click the dropdown list beside “Check for project updates”
Choose how often to check
- If a project has changed, a green dot is shown on the project menu icon.
For more details watch What's new main menu.
Send/receive to the Internet
- Make sure your computer is connected to the Internet.
- If you want to send/receive other projects, or change the way to send/receive
- ≡ Paratext under Paratext > Send/Receive projects
- Choose Internet Server
- Check the box next to the projects to Send/Receive.
- Click Send/Receive.
- The computer will make a copy of your files. A progress meter will be displayed. A message box will only appear if there are any problems.
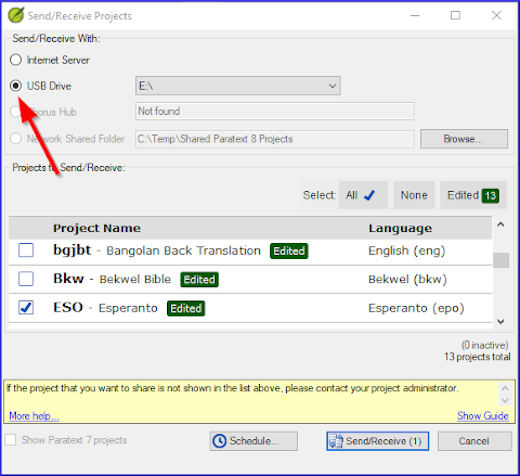
Send/receive to a USB stick to backup your data
It is essential to have a second copy of your translation. If you don't have access to the Internet, then you can use a USB stick. To backup your data to a USB stick you do a Send/Receive as follows:
Insert your USB key into your computer.
≡ Paratext, under Paratext > Send/Receive project(s)
Choose USB drive.
Check the box next to the projects to Send/Receive.
Click Send/Receive.
- The computer will make a copy of your files. A progress meter will be displayed. A message box will only appear if there are any problems.
Send/Receive Again
The next time you want to Send/Receive you can use the toolbar to Send/Receive using the same settings as the previous time. This option does not allow you to choose a different method or different projects.
- Insert your USB stick into your computer or connect to the Internet.
- Click the Send/Receive icon
- Paratext will immediately Send/Receive.
![]()
4.10 Moving your cursor efficiently
A lot of time is spent moving your cursor to the place where you need to add text or make corrections. Here are some useful keystrokes to move your cursor quickly.
- The keys
- arrow keys ← ↑ → ↓
- Home, End, PgUp, and PgDn,
- F8 (chapter), F9 (book)
- Try pressing Ctrl + any of those keys. Some may be quite different to what you expect.
- Ctrl + Arrow Down = Next Verse (Ctrl + Arrow Up for previous verse)
- F8 = Next Chapter (Ctrl + F8 for previous chapter)
- F9 = Next Book (Ctrl + F9 for previous book)
- Alt + Arrow Left/Right = previous/next reference in history
- Alt + Arrow Up/Down = previous/next reference in a list
- Ctrl + B = go to the navigation area of the toolbar.
4.11 Recall:
If the titlebar doesn’t say Editable (or your name), you should try changing the __.
To add a different marker (such as section heading) you press ___.
To add paragraph marker you type ____.
To insert a footnote, you use the ___ menu and choose __.
To send/receive, you use the __ menu then ____.
[Answers: view, Enter or \, Enter, Insert, Footnote, Project, Send/Receive this project]