14. Printing Drafts
Introduction In this module you will learn how to print a draft of your translation for checking and revising.
Before you start You have entered and checked your translation in Paratext 9 and are now ready to print out a copy. In Paratext 9.4, your project does not need to be registered before you can print.
Why this is important It is much easier to revise and check your work on paper than on the computer. You can also give it to more people if it is on paper.
What you are going to do You will first produce a PDF version of your translation, which you can print or share with others (including non-Paratext users). If necessary, you can copy the PDF file onto your USB stick and take it to a computer with a printer.
PTXPrint has replaced the old Print Draft PDF.
It is currently only available in Arabic, Chinese (Simplified), English, French, Hungarian, Indonesian, Portuguese, Romanian, Russian and Spanish.
If it is not installed, it will ask you to download and install it first. PTXPrint is very powerful and has many options. We recommend that you select a language and then use Mini View.
14.1 Create your first PDF file
Make sure you have completed the markers check before printing a draft.
- ≡ Tab, under Project > Export Draft PDF (PTX Print)
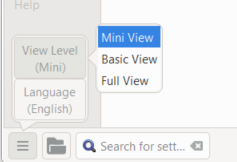
- At the bottom left, click the menu button
- Click View Level > Mini View
- Click Basic at the top left of the sidebar
- Check that your project is selected.
- Either choose Single book, then choose the book and chapters
- OR If you want to print your priority or more than one book, choose Portions or multiple books and enter the references manually.
Choose the page settings as follows
- Click Layout on the left sidepanel. Choose the page settings as follows
- Page size:
- 210mm, 297mm (A4) or
- 148mm, 210mm (A5)
- Adjust the Base Font size as necessary (normallly 11pt)
- Adjust the Base Line Spacing (single spacing is 120% of font)
- Turn off Two Column Layout
Choose the font for the text
- Click Fonts+Scripts on the left sidebar
- Choose the font for the Body Text (Regular): Charis SIL (or Charis SIL Compact)
- Size: 10 (or 11)
Print (Make PDF)
- Click on the Print (Make PDF) button
- PTXPrint will make the PDF
- The PDF opens in your default PDF program.
Need further changes?
The Mini View is good to test your PDF. If you want to make any changes, you can change the view level to Basic View. Full view is very advanced and good for your final publication.
- Change to Basic View
- At the bottom left, click the menu button
- Click View Level > Basic View
- Click Layout towards the top left of the sidebar
- Choose Margins
- Check Mirror Pages
- Click Header+Footer in the sidebar.
- Choose what you want in the Header (the text at the top of the page).
- Choose what you want in the Footer
- Make any other choices as needed.
- Click Print (Make PDF) and wait, the file will open in your PDF reader.
Print an A5 Booklet
Make sure you have changed to Basic View
In PTXPrint
- Click on Finishing in the sidebar
- Under Booklet Pagination, Pages Per Spread
- Choose 2-up
- Check that the physical paper size is correct.
- Click Print (Make PDF)
In you PDF software
- File > Print
- Print the 2-up version double-sided
- Click on the Printer Properties button
- A dialog is displayed which may be different but will have a way of setting double-sided. For example
- Click on Finishing
- Choose duplex or two sided.
- Click OK
- Click Print
If you want to follow a punctuation system (such as French) and have spaces automatically inserted before complex punctuation, then see a consultant to have changes made to your PrintDraftChanges.txt
14.3 Copy PDF file to a USB stick
Paratext saves the PDF file in the PrintDrafts folder of your project folder. For example, C:\My Paratext 9 Projects\XXX\local\ptxprint
There are many ways to copy files. One method is described below.
- Hold the Windows Key and type E
- Windows Explorer opens
- Go to your My Paratext 9 Projects folder
- Double-click on your project folder
- Double-click the local folder then the ptxprint
- Right-click on the desired PDF file
- Choose Send to
- Choose your USB stick.