4. Keyboarding your draft
Introduction This module explains how to keyboard your draft translations into a project in Paratext 9.
Before you start We are about to keyboard text into an existing project. Antes de poder fazer isso, alguém deve ter instalado o programa e criado um projeto para seus dados.
Why this is important This is the first stage of entering your translation into the computer. Depois que o texto for digitado, você poderá executar várias verificações no conteúdo e formato do texto.
4.1 Go to a Biblical verse
Antes de começar a digitar seu texto, você precisa mover o cursor para o livro, capítulo e versículo corretos. Você usa a barra de ferramentas para fazer isso.
Usando os ícones na barra de ferramentas, altere o projeto, livro, capítulo e versículo conforme necessário.

No Paratext 9.3, você pode copiar e colar uma referência bíblica no nome do livro na barra de navegação. Por exemplo, em inglês: MAT 12.3, Mrk 5:4, Gálatas 1:12.
If you don't know the verse reference, you could use the Find feature to look for a word that occurs in the verse you are looking for. Ctrl+F.
4.2 Check that the project is editable
Olhe para a barra de título do seu projeto.
The titlebar should have the word (**Editable**).

- Se não for editável, tente alterar a visualização (veja abaixo).
- Se o livro não for editável e você precisar editá-lo, deve falar com o administrador do projeto.
4.3 Changing the view
O Paratext 9 possui cinco visualizações. Todas, exceto a visualização de pré-visualização, são editáveis.
- Ctrl + E -or-
- ≡ Tab under View menu, choose the view (usually Standard).
4.4 Typing special characters
Alguns caracteres ortográficos não estão presentes no teclado. Para digitar esses caracteres, você precisa pressionar mais de uma tecla.
- Altere o sistema de teclado conforme necessário no seu computador.
- Se estiver usando o Keyman, escolha seu teclado (por exemplo, Tchad Unicode)
(ou para teclados MS, escolha AF ou TR/SQ/TZ/AF...) - Digite as teclas para o caractere especial (consulte o gráfico).
You can use ≡ Tab under View > Highlight Invalid Characters to quickly see if you have typed any invalid characters. If you see lots of punctuation, then ask your instructor or administrator to configure your character inventory.
4.4.1 Whitespaces and invisible characters
Paratext 9.5 introduces better support for displaying and entering whitespace and invisible characters. However, to use this, all members of a team must upgrade to 9.5, as the project will no longer be back-compatible
Any project can turn the display of these characters on and off. Projects that use a variety of whitespace and invisible characters will benefit from opting into or “enabling” the feature.
This feature allows teams to view and edit whitespace and invisible characters in these areas:
- Text editor, Wordlist, Spell checking dialogs, Results list,
- Scripture Reference Settings, Numbers Settings, Character inventory, Quotation Rules.
The Administrator enables it by clicking the dropdown on the paragraph icon on the toolbar

4.5 Adding text in another marker – title or introduction
Cada trecho de texto precisa ter um marcador. Os marcadores para os capítulos e versículos já estão presentes em seu projeto. Quando você deseja adicionar texto, como títulos ou introduções etc., você também precisa adicionar o marcador apropriado da seguinte forma:
- Mova o cursor para o final do parágrafo anterior.
- Type Enter
- Type the marker (e.g. s1 or ip) press Enter (or select it from the list).
- Digite o texto.
- Digite o texto após \ft.
Você sempre deve ter um marcador USFM após um título e antes do versículo. Geralmente, é \p (parágrafo), mas pode ser diferente (por exemplo, \q1).
Character markers
Paratext has both paragraph and character markers. As the name suggests, paragraph markers format the whole paragraph. Character markers let you format part of the paragraph and so need a beginning and ending marker.
- Select the text you want to apply the character style
- Type **
- Select the marker from the list (e.g. nd)
- Press Enter
- Paratext adds the two markers (before and after the text)\ (for example: \nd LORD\nd*)
It is important to note that pressing Enter displays paragraph markers and typing \ displays character markers.
4.6 Add paragraph breaks
Dividindo o texto em parágrafos:
- Mova o cursor para onde deseja fazer a quebra de parágrafo.
- Press Enter
- Type p, then Enter.
4.7 Saving your work
É importante salvar seu trabalho regularmente.
- ≡ Paratext under Paratext > Save All
- OR Ctrl + S
4.8 Insert Footnotes
Você pode adicionar notas de rodapé no texto no local onde deseja que a referência seja exibida.
- Mova o cursor para onde deseja inserir a nota de rodapé.
≡ Tab, under Insert > Footnote
- A set of footnote markers is added in the box below the text
Type the text after the \ft
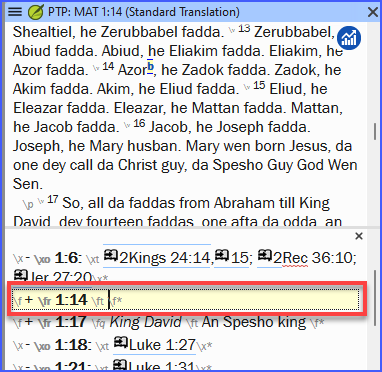
Se você passar o mouse sobre a letra sobrescrita, o texto da nota de rodapé será exibido em uma caixa de dica.
- To change the footnote, click the superscript letter in the text.
- To delete the footnote, you can delete the superscript letter.
- or right-click the footnote text and choose delete.
4.9 Send/receive
É essencial ter uma segunda cópia de sua tradução e compartilhar seu trabalho com outras pessoas da equipe. Isso é feito por meio do envio/recebimento conforme a seguir:
Send/receive this project to the Internet
- Verifique se seu computador está conectado à Internet.
- ≡ Tab under Project,> Send/Receive this project
- O Paratexto enviará/receberá imediatamente, ou seja, sem oferecer diferentes opções.
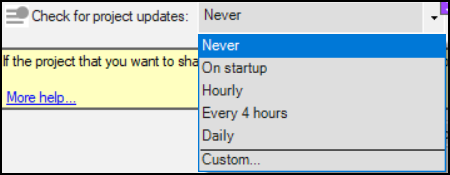
In 9.4, Paratext can notify you when there are updates to any of your projects.
Marque a caixa ao lado dos projetos para enviar/receber.
Click the dropdown list beside “Check for project updates”
Choose how often to check
- If a project has changed, a green dot is shown on the project menu icon.
For more details watch What's new main menu.
Send/receive to the Internet
- Verifique se seu computador está conectado à Internet.
- Se você deseja enviar/receber outros projetos ou alterar a forma de enviar/receber.
- ≡ Paratext under Paratext > Send/Receive projects
- Choose Internet Server
- Marque a caixa ao lado dos projetos para enviar/receber.
- Click Send/Receive.
- _O computador fará uma cópia de seus arquivos. Um medidor de progresso será exibido. Uma caixa de mensagem só aparecerá se houver algum problema.
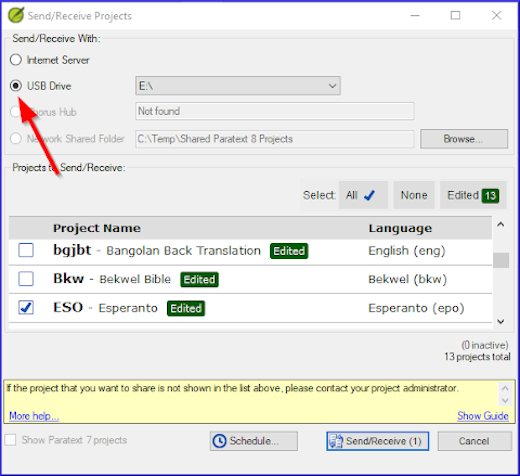
Send/receive to a USB stick to backup your data
É essencial ter uma segunda cópia de sua tradução. Se você não tiver acesso à Internet, poderá usar um pen drive. Para fazer backup de seus dados em um pen drive, faça o envio/recebimento da seguinte forma:
Insert your USB key into your computer.
≡ Paratext, under Paratext > Send/Receive project(s)
Choose USB drive.
Marque a caixa ao lado dos projetos para enviar/receber.
Click Send/Receive.
- _O computador fará uma cópia de seus arquivos. Um medidor de progresso será exibido. Uma caixa de mensagem só aparecerá se houver algum problema.
Send/Receive Again
Na próxima vez que você quiser enviar/receber, você pode usar a barra de ferramentas para enviar/receber usando as mesmas configurações da última vez. Essa opção não permite escolher um método ou projetos diferentes.
- Insira seu pen drive no computador ou conecte-se à Internet.
- Click the Send/Receive icon
- Paratext will immediately Send/Receive.
![]()
4.10 Moving your cursor efficiently
Muito tempo é gasto movendo o cursor para o local onde você precisa adicionar texto ou fazer correções. Aqui estão algumas teclas úteis para mover o cursor rapidamente.
- As teclas
- arrow keys ← ↑ → ↓
- Home, End, PgUp, and PgDn,
- F8 (chapter), F9 (book)
- Try pressing Ctrl + any of those keys. Some may be quite different to what you expect.
- Ctrl + Arrow Down = Next Verse (Ctrl + Arrow Up for previous verse)
- F8 = Next Chapter (Ctrl + F8 for previous chapter)
- F9 = Next Book (Ctrl + F9 for previous book)
- Alt + Arrow Left/Right = previous/next reference in history
- Alt + Arrow Up/Down = previous/next reference in a list
- Ctrl + B = go to the navigation area of the toolbar.
4.11 Recall:
Se a barra de título não exibir Editável (ou seu nome), você deve tentar alterar a __.
Para adicionar um marcador diferente (como um cabeçalho de seção), você pressiona ___.
Para adicionar um marcador de parágrafo, você digita ____.
Para inserir uma nota de rodapé, você usa o menu _**__ e escolhe **__.
Para enviar/receber, você usa o menu _**_ e depois **____.
[Respostas: visualização, enter ou \, enter, Inserir, Nota de rodapé, Arquivo, Enviar/receber]